









































In your profile you change your name, date of birth, language and time zone, switch your e-mail address and add your billing address.
Your profile holds the personal details of your LinkHarbor account. You open it via “Profile” in the navigation or via your avatar menu at the top right → “Account”. The profile belongs to you as a person, not to a workspace, so you manage it yourself whatever your role.
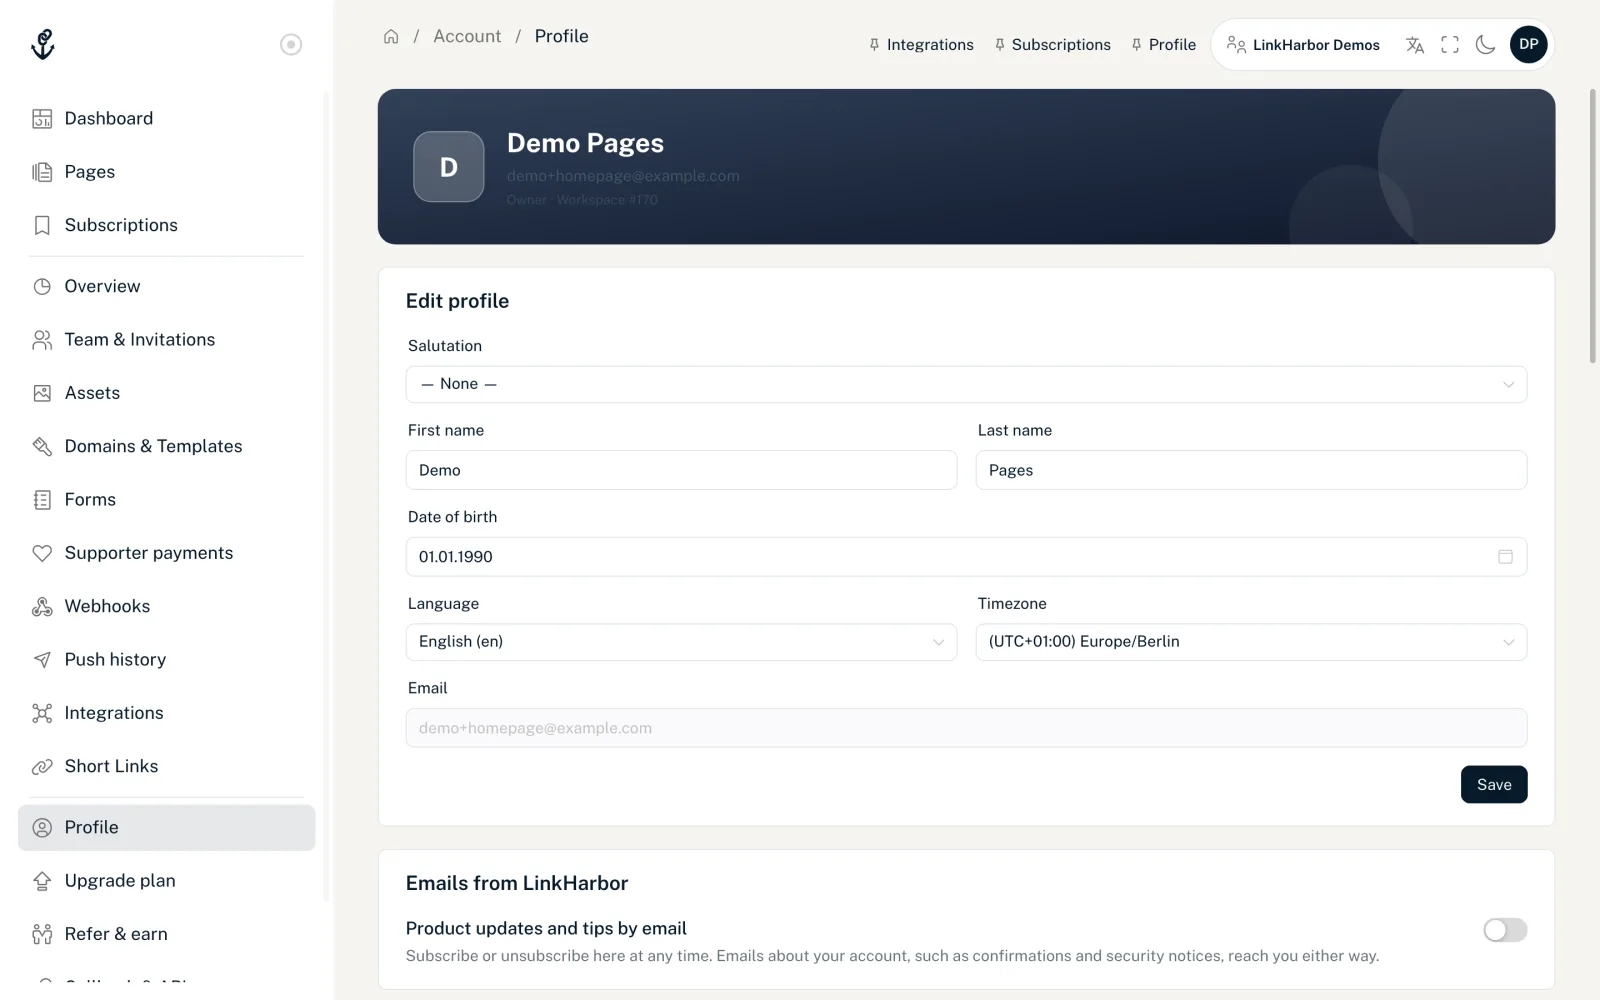
How the profile page is laid out
At the top you see your initial and your name, your e-mail address and your role, such as “Owner”, plus the number of the active workspace. Below that come the cards:
- Edit profile
- Emails from LinkHarbor
- Change email address
- Change password
- Two-Factor Authentication
- Billing address
- Billing & Plan
- Danger zone with “Delete account”
There is no profile picture for your account; the avatar icon shows your initials. You set the picture on your page in the Page Builder, see Images: profile photo, header and background.
Edit profile
- Salutation
- None, Mr., Ms., Mx., Dr. or Prof.
- First name and last name
- Up to 100 characters each. Your name appears in the dashboard and in invitations you send to others.
- Date of birth
- In the format DD.MM.YYYY. A date in the future isn't possible.
- Language
- The language of the dashboard and of the e-mails you receive from LinkHarbor. There are 43 languages to choose from; the list is searchable.
- Timezone
- Your time zone with its UTC offset. Your browser's time zone is preselected.
- Display only. You can change the address in the next card.
Click “Save”, and “Profile saved.” appears. A changed language applies to the interface immediately. Empty fields are not saved: you can change a detail once it's saved, but not clear it. If all fields are empty, you see “Please fill in at least one field.”
E-mails from LinkHarbor
You always receive important e-mails about your account, for example about password changes, changes to your e-mail address, team invitations and your subscription. They arrive in the language set in your profile and you can't unsubscribe from them.
Product updates and tips, on the other hand, are optional. In the “Emails from LinkHarbor” card you switch them on or off with “Product updates and tips by email”; the setting applies immediately (“Subscribed to product updates.” or “Unsubscribed from product updates.”). You can also opt in when you sign up. LinkHarbor isn't sending any such e-mails yet.
If the footer of an e-mail says “Replies to it reach our support team.”, you can reply to the e-mail directly. Which e-mails there are and what to do if one doesn't arrive is explained in E-mails from LinkHarbor: overview and help.
Change your e-mail address
- In the “Change email address” card, enter the new address under “New email address”
- Confirm in the “Current password” field
- Click “Change email”; “Confirmation email sent.” appears
- Open the e-mail “Confirm your new email address” in your new inbox and click the link
- Sign in again with the new address
The change only takes effect once you confirm the link. Until then you keep signing in with the old address. For security, we send the notice “Your email address is being changed” to the old address. The confirmation link is valid for 24 hours.
| Message | Meaning |
|---|---|
| “The password is incorrect.” | The current password is wrong |
| “This email is already in use.” | There is already a LinkHarbor account for the new address |
| “Invalid email or identical to current.” | Check the spelling; the new address must be different from the old one |
| “Link expired” | The confirmation link is older than 24 hours; start the change again |
| “Too many wrong passwords. Please wait a few minutes and try again.” | A wrong password five times within 15 minutes; wait 15 minutes |
We send at most 3 confirmation e-mails per address per hour.
If you only sign in with Google or Facebook, you don't have a password for the confirmation yet. First set a password via “Forgot password”, see Change and reset your password.
Billing address
You need the billing address for an upgrade. It appears on your invoices.
- Company name
- Optional, up to 200 characters.
- Street & number, postal code, city, country
- Required for the checkout.
- Tax ID (optional)
- For businesses in the EU. With a valid VAT ID, the invoice can be issued without VAT (reverse charge).
Click “Save billing address”. If you come from an upgrade because the address was still missing, the button is called “Save and continue to checkout”, and afterwards you go straight to the payment. See Upgrade, payment and invoices.
Billing & Plan
This card shows the plan of your active workspace, the usage of your resources as used / limit, and the features unlocked. On the Free plan, “Upgrade” takes you to the “Manage plan” page. More in Plans compared.
If you originally created your account as a reader-only account in the LinkHarbor app, this card shows “Become Creator”. One click switches your account over, and then you can create your own pages.
More settings
- Change and reset your password
- Two-factor authentication
- Delete your account
- You find connected apps and API keys under “Callback & API”, see AI assistants: permissions, security and limits and API keys and access tokens
You might also find this useful
Nothing found?
Tell us what you need, and our support team will help you personally.